Risk Management Toolkit: 6 Essential Parts
02 Mar, 2022
While handling any engineering project, your Risk Management Toolkit will help you counter uncertainties. Building a reliable and robust strategy to deal with these uncertainties is essential for successfully running projects with many risks.
Handling project risks is one of the core roles that any risk manager or project manager needs to handle. Software development and engineering involve many advanced technologies, so risks are inevitable. This article discusses what you need inside your Risk Management Toolkit to deal with these risks to avoid slowing down the projects.
What is a Risk Management Toolkit?
A Risk Management Toolkit is a collection of tools required to deal with risks in your project. The toolkit will help you quickly identify, assess, and respond to risks.
Below is a list of the six essential parts of a risk management toolkit.
- A tool to identify risks
- A tool to register risks
- A tool to perform a risk assessment
- A tool to analyse the risks
- A tool to communicate your risks
- A tool to mitigate risks
When should you have your risk management toolset ready?
Before starting the project, you should have your risk management toolset. So, when the requirements and scope of the project are determined, choose what to include in your risk management kit.
Risk management and project size
To know what you need in your risk management toolset, you need to grasp the type of project you are undertaking. If the project is small, the toolkit may be small as well. However, you will need a more comprehensive and sophisticated toolkit for larger projects.
Who will be involved in your risk management process?
While creating your risk management toolkit, it is important to consider the team members (internally or externally) that will need to use it. The project manager is the number one stakeholder of the risk management toolkit because it helps them plan for projects effectively. Other project stakeholders that use the risk management toolkit include Engineers, Configuration Managers, Documentalists, Developers, Managers, and a variety of experts.
1. A tool to identify risks
As we shared with you earlier, the first step in managing project risk is identifying possible risks during the various development stages. It is important to use a consistent approach to risk identification.
Types of ways to do risk analysis
There are many methods you can use to scan for risks.
- Brainstorming
- SWOT analysis
- Check common risks
Where to look for risks?
Risks can come from any project area, and you must capture all important risks. The following are some of the most common places where risks are:
- Project management processes
- Product and technology risks
- People risks
- External environment risks
- Contractual and financial risks
- Technological risks
The preceding list is not exhaustive, but it gives a good idea of where risks originate.
Who identifies the risks?
Identifying risks can be done by a team of experts, the project manager, or the whole team. While the entire team can identify risks, clarifying who is responsible for risk identification is essential. This way, there is no confusion.
Who should receive a notification?
Specific people who deal with the project’s components should receive actions for the risk. The notification list will depend on the organisation’s specific risk management process, but it typically includes the project manager, risk owner, managers, and other stakeholders. Ask yourself, are there only specific people that need to know about the risks, or does the whole team need to be aware of them?
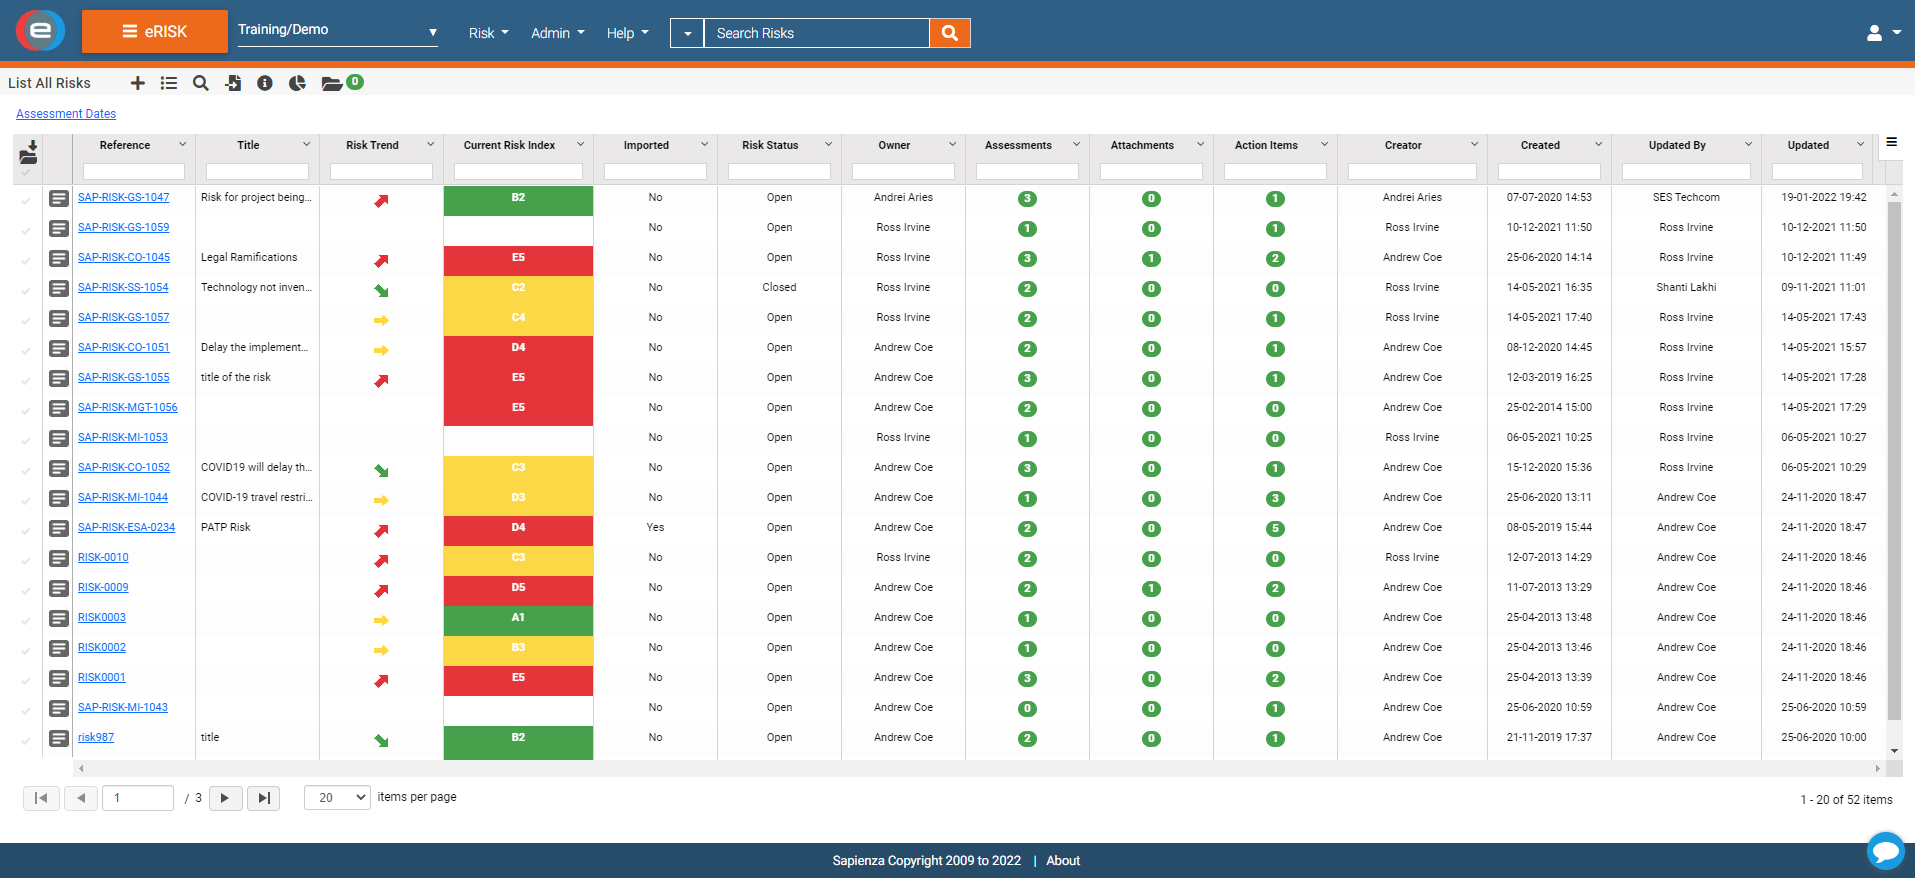
2. A tool to register risks
Once identified, risks need registration to track and handle them. A risk register is a tool used to do this.
What to include in a risk register?
A risk register typically includes the following information:
- Risk ID
- Description of the risk
- Dates
- Risk owner
- Risk category
- Potential impact
- Attachments
- Likelihood of the risk happening
Registering your risks is an essential step in risk management as it helps you track them. The team can decide to track different types of information, but the key components are the risk’s description, potential impact, and the likelihood of it happening.
3. A tool to perform a risk assessment
Risk assessment determines the potential impact of risk (severity) and the chance of it happening (likelihood). Domains for risk assessment can be technical, schedule, cost, quality, and others. Each risk will have its domains. For example, some risks might not impact costs or the process, while others will severely impact them.
The most common risk domains are:
- Technical
- Process
- People
- Cost
- Environmental
- Contractual
Who assesses the risks?
When putting the risks inside the risk registry, it is crucial to have someone assess the risks. The assessor can be different for each risk or the same person for all risks. The assessor will also determine in which domains the risks will be assessed.
When does risk assessment happen?
Risk assessment can happen at different stages. You can start with an initial risk assessment when you put in a risk item, and you can then choose to reassess the risks after a set period or a significant change in the project. In general, you schedule a risk assessment to avoid accidents.
What is the goal of risk assessment?
Risk assessment aims to determine if a risk is worth taking by calculating the risk’s potential impact and likelihood. If the potential impact is high and the likelihood is high, the team should take action on the risk.
4. A tool to analyse and monitor the risks
Risk management doesn’t stop at identifying and assessing the likelihood and impact of the risk; there is also a need to continuously monitor the risks to determine how much impact they might have over time.
After completing the risk assessment, the team can use a tool to analyse and monitor the risks. Risk analysis will help them make better decisions on what to do with the risks. The most common tool used for this is a risk matrix.
What is a risk matrix?
A risk matrix is a tool that helps you to compare and contrast risks. It has two axes: potential impact and likelihood. The risk matrix can be large or small. Usually, a risk matrix consists of a 5×5 or 3×3 grid, but you can customise it.
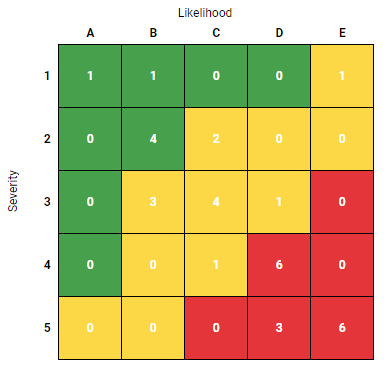
How do you use a risk matrix?
A risk matrix will help you review all risks in the project and prioritise those with the highest probability of occurring. You can choose to ignore some risks whose likelihood of happening is very low. In contrast, the risks that score high on likelihood and severity need more attention.
The risk matrix can also aid brainstorming for the project. How can we reduce the impact of a risk? What can we do to prevent it from happening?
Historical changes in risk
Tracking the historical changes of the risks can help in decision making. The team should be able to track how the risk changes over time, and this will help them understand if the risk is getting worse or better.
It will also help to see if people are dealing with the risks. For example, if the finance department hasn’t responded on the domain of cost or risk is trending upwards, it might indicate that the team needs to focus more on that risk.
5. A tool to communicate your risks
The risk register and risk matrix create a visual representation of the risks. They will signal you which risks need your attention and help others understand the risks faced by your project. However, as with anything else in life, communication is vital. If you have risks, it is essential to prioritise actions for you or your team to deal with them.
Setting an action for your team
The action can be something as simple as putting the risk on a list and revisiting it later, or it could be something more complex such as setting up a mitigation plan. Setting up actions within your risks clarifies who is dealing with the risk and when this needs to happen.
Actions are specific steps taken to prevent the risk from happening or reduce its impact. The project manager will usually assign the actions to someone, and they need to track and analyse the actions taken.
Risk escalation to another level and project
Risk escalation is when the risk reaches a certain level, requiring the attention of a higher level in the organisation. The project manager usually escalates the risk to their boss. The risk might need to be escalated if it is high in impact and likelihood, if no action is taken, or if it affects other parts of the organisation.
Risks can be copied from one project to another if they are relevant to other managers, and they can then decide the severity and likelihood of the risk in their domains. Risks can also be transferred entirely to another department or project (risk delegation) if they are better suited to deal with it. For example, the marketing team might be better suited to deal with a risk related to branding.
6. A tool to mitigate risks
Any reliable risk management toolkit needs to have tools and strategies to mitigate risks. There must be corresponding measures put in place for each project risk to mitigate it from occurring. Adding a risk mitigation tool is a proactive approach since it focuses on mitigating the risks to avoid facing their consequences when they occur.
Choosing a mitigation strategy
Risk management applications should have built-in tools that you can use to create and communicate the strategies and the same tasks that have to be executed to mitigate the various risks that your project might face during implementation. Options you can choose for mitigation risks are, for example:
- Accept: This involves accepting that the risk exists and impacts the project.
- Avoid: The focus here is to create strategies to help you avoid or minimise the effects of the risk.
- Control: This involves coming up with actions that you have to implement to reduce the overall impact of the risk on the progress of your project.
- Transfer: This involves creating a strategy that you can use to transfer the risk to another group of project stakeholders that are more equipped to handle it.
- Continue Monitoring: It involves strategies for continuous monitoring of the risk’s impact on the project over time.
Classifying risks is a critical step in any risk management process. The wrong label can lead to confusion and misunderstanding, so it is important to ensure that everyone involved in the project understands the classification system. Fixed checklists and guidelines will provide this.
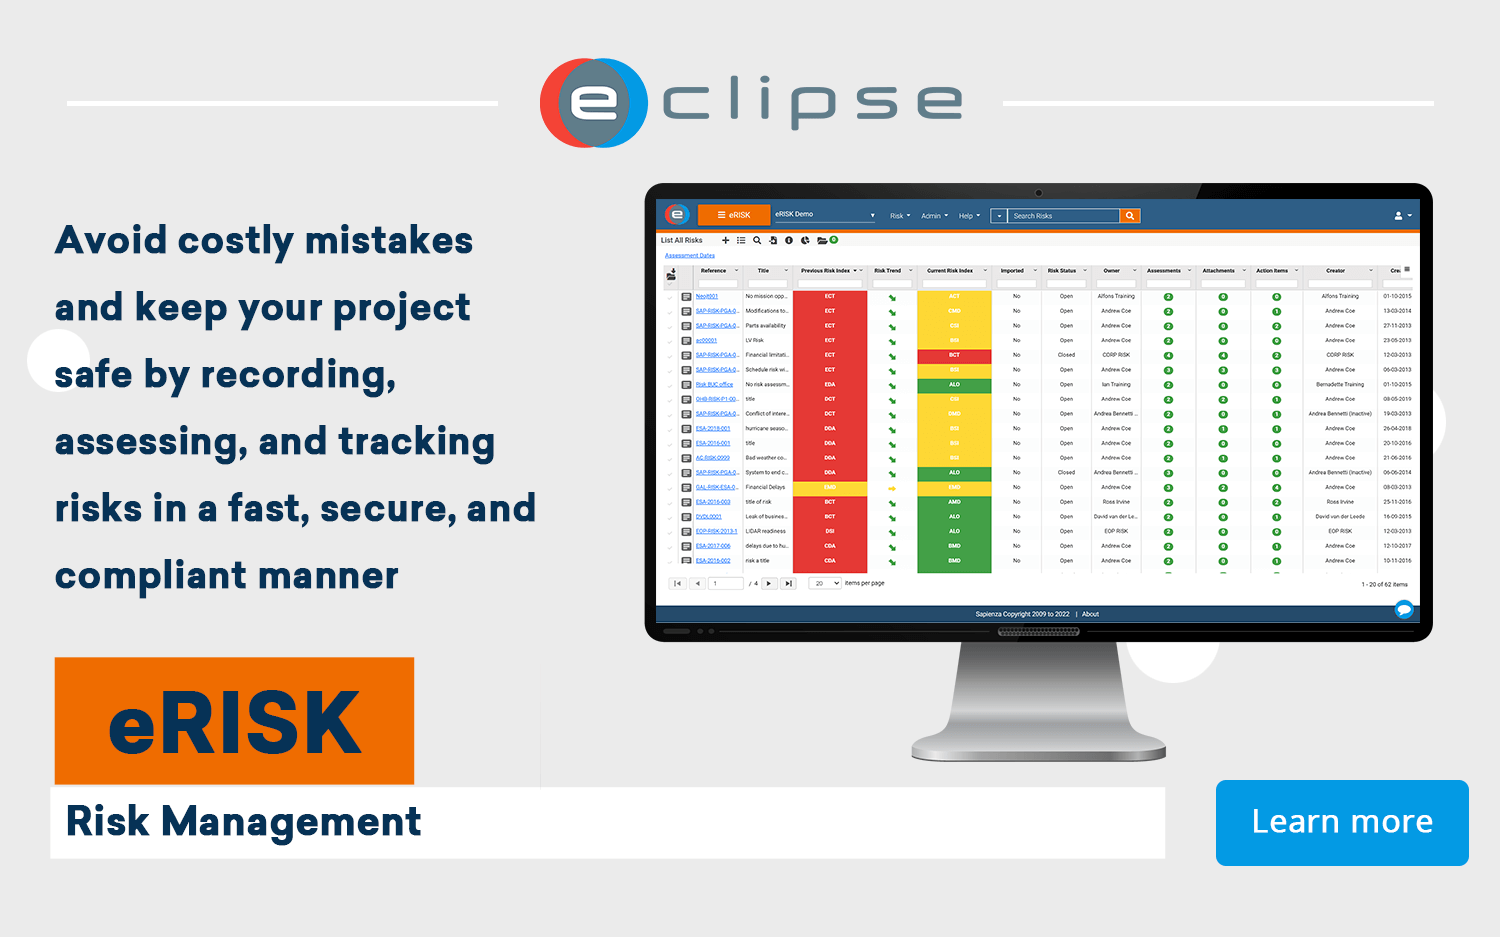
A world from ECLIPSE Software Suite
Your toolkit should include tools for identifying, registering, assessing, analysing, communicating and mitigating risks. It is also crucial to choose tools that communicate with each other to avoid manually importing data from one app to another. For instance, the tools you choose for mitigating the risks need to get data from the risk assessment tools. This integration allows for seamless data exchange, making it easier and faster to implement your risk management strategy.
If you are looking for a risk management toolkit that can do it all, our eRISK module offers all the features and functions mentioned in this article. eRISK is a web-based module that allows users to manage risks for all projects. It includes an extensive risk register that helps you identify, assess and track risks, as well as mitigation strategies and corresponding tasks. Contact us today to find out more about eRISK, and get a free trial, to see how it can help you manage your project risks.